Pages

Sunday, January 6, 2013

Butternut Squash Mac & Cheese

9 times out of 10, if you ask Mags what she wants for lunch or dinner, she'll say Mac and Cheeeeese!
Needless to say, I'm always on the lookout for different mac and cheese recipes that include some veggies.

One of my go-to favorites is Skinnytaste's baked mac and cheese with broccoli.  Then I saw this Butternut Squash Mac and Cheese recipe on Tastykitchen.com and was very intrigued.  Butternut isn't something I typically cook with, not that I don't like it, I just sort of don't know what to do with it, besides make puree.

When Mags was a baby, I made all of her baby food from scratch.  She used to love butternut squash puree, so I would roast squashes all the time for her.  And now she's not a baby anymore :(  so we got away from the squash.

Well, not anymore...

Butternut Squash Mac and Cheese

1 butternut squash (1 cup puree)
4 Tablespoons cream cheese
2 Tablespoons butter
2 Tablespoons flour
1 1/2 cups milk
2-3 cups shredded mexican blend or cheddar cheese
pound of cavatappi pasta
salt
pepper
paprika

Directions:
Cut the butternut squash in half lengthwise, scrape out seeds with a spoon, and place cut-side down in a roasting pan.  Pour in about an inch of water.  Roast, uncovered, at 400 for about 45 minutes (or up to an hour if your butternut is big) until tender.  (I stab it with a knife to see if its ready).  Let cool enough to handle, then scoop out the flesh and puree in food processor.


You only need 1 cup of the puree for this recipe, so I freeze the remainder of the squash for the next time I make it.
Put a bot of water on to boil for pasta, and cook according to package directions.
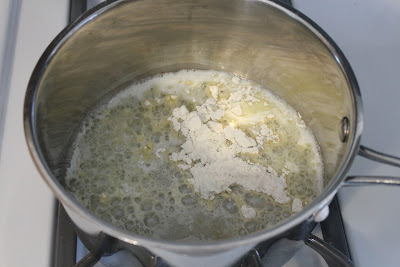
Meanwhile, melt butter in saucepan then whisk in flour.


 Let cook for a minute or two, whisking often. Slowly whisk in the milk.  Let cook for a few minutes to thicken.
Then, add the rest of the ingredients, whisking to make a smooth sauce.  Season to taste with salt, pepper, and paprika.


Mix the pasta with the cheese sauce and enjoy!


Zucchini???

I glanced in the veggie drawer this morning and noticed a lone zucchini with no purpose.  Two overripe bananas were sitting on the counter.  Hmmmm.  Found this recipe for banana zucchini muffins and smiled since I had everything on hand.  Out came the mixer and I got busy.

I mashed the bananas and went to grab the zucchini to shred... and this is what I found...


A friggin cucumber!  You've got to be kidding!  How clueless am I?!?

So I put my thinking cap on.

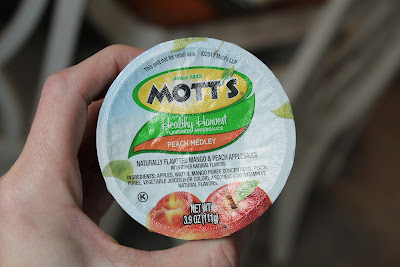
What else could I throw into the recipe in place of zucchini.... drumroll..... a cup of Maggie's snack sized Mott's peach apple sauce!


Sweet Success :)


Banana Peach Applesauce Muffins
Makes about 12 muffins

1/3 cup shortening
1/2 cup sugar
2 eggs
1 3/4 cups flour
1 teaspoon baking powder
1/2 teaspoon baking soda
1/2 teaspoon salt
2 ripe bananas, mashed up
1 container Peach Applesauce


Directions:
Preheat at 350 degrees.  Cream together the shortening and sugar, then add the eggs and beat well.  Add in the dry ingredients, mashed bananas, and applesauce.  Pour into lined muffin tin.  Bake for 30 minutes.


Tuesday, November 13, 2012

Another drop in the bucket...

I can't express how excited I am to start!   =)


Holiday Bucket List

8
Introduce Elf on a Shelf
Send out Christmas cards
Go pick a tree
Bring cookies to neighbors
Decorate the tree & hang up the stockings
Watch Christmas Vacation
Illuminate the exterior
Drive around to look at Christmas lights
Hot Cocoa and X-Mas movie marathon
Read the Christmas Story
Watch White Christmas
Advent Calendar
Bake and decorate a Gingerbread House
Take a picture with Santa
Listen to Christmas carols next to the lit up tree

Sunday, November 11, 2012

Gunk Removal 101

 
Ughhh....
I swear I'm not a slob.  Really.

I love it when my honey offers to make breakfast, what I don't love is the aftermath in the kitchen.Thankfully, I've learned an awesome, easy trick for cleaning the grates with minimal elbow grease.I saw this on Pinterest, of course, gave it a try, and was pleasantly surprised at how well it worked.


All I do is take off the grate and place it in a large ziploc bag with about 1/4 cup of ammonia.  You don't need a lot, I usually just pour a bit in without measuring it.  The ammonia fumes are really the key to this.  I zip up the bag and place it on a tray or rimmed baking sheet ( just in case there's a leak) and let it sit for a few hours.  The ammonia stinks, so I try to leave the grates in the porch or on the deck.


Then, while that's sitting out of the way, I use some Ajax to tackle the actual stovetop.  This part is a bit  more work, but most of the gunk comes up pretty easily.
Oh and FYI... NEVER mix ammonia and bleach... I think you can die or something.  

After I cleaned the stove top, T Mags and I went outlet shopping all afternoon :)
When we got back, I took the grates out of the bags and put them one at a time in the sink.  I took an old toothbrush that I use for cleaning and brushed off all the gunk pretty easily.  After I'm happy with the gunk-removal, I give the grate a good rinse with water and dry it.  That's it.


It's like a new stove-top.  Unbelievable.

Here's a quick side by side, before & after


Saturday, November 10, 2012

A step up...

Our girl has been potty trained for a while now, but it's time for her to get a bit more independent with her bizzness... enter step-stool... Mags needed something that would help her get on and off her throne, without Mommy's help.

Before darn Hurricane Sandy, Mags and I had popped into the craft store to pick up some stuff that would keep us busy for a few days stuck inside... Found this little step stool and scooped it up with a 40% coupon :)

Painted it a light sand color with left over paint in the basement


Then, grabbed some blue painter's tape and went to town...


Painted again, this time using left over blue craft paint from an old project


After some careful peeling... 


A cute upgrade for our girl :)


Friday, November 2, 2012

Apple Coffee Cake

An easy, deelish fall treat... Baked this up at least once a year for a while now, and it never disappoints.  Originally found the recipe on ivillage.com. and have tweaked it over time... perfect with a nice steamy cup of coffee on a crisp fall morning :)


1/2 cup chopped walnuts
2 eggs
2 cups flour
1tsp baking soda
1 cup sour cream
1 large apple, peeled and chopped
1/2 tsp salt
1 tsp baking powder
1 tsp vanilla
1/2 cup butter softened
2 tsp cinnamon
1 1/2 cup sugar

Combine the nuts, 1/2 cup of sugar, and cinnamon and set aside.
Cream butter and rest of sugar.  Beat.  Add eggs one at a time, beat well.
Add vanilla.  Combine dry ingredients and add alternately with sour cream, beating well each time.
Spread half in greased pan, then spread apples and half of cinnamon/sugar on top.
Then spread remaining half of batter on top, and spread out evenly.

Top with the remaining cinnamon/sugar mixture.

Bake at 375 for 40 min. (let stand for a bit before removing from pan)

Enjoy!


It's TIME!!!!


November 2nd.... the first day Optimum plays Christmas music on one of its music channels... YES... I've been waiting for this for weeks!  And after a week of hurricane damage, powerless nights, and stress, I could use a little holiday cheer.

It feels so good to actually DO something that I've been oogling on Pinterest!  Right before Hurricane Sandy reared its ugly head, I decided to hit up Michael's for some craft supplies to keep me busy if we were powerless, or stuck at home... Thank goodness I did, because Sandy was a bihotch!  I can't believe the craziness that has consumed the past week.  I still can't believe school was cancelled for 5 DAYS!  unbelievable...

Anyway... I picked up a 3ft by 3ft piece of dark green felt and some smaller pieces of other colors for ornaments and gifts.  When the power went out, I lit my candles and lanterns, whipped out my scissors and got busy...


I hung the tree up with those 3m restickable/easily removable tapey thingy-ma-jiggies ( you know what I mean)...


Maggie has LOVED taking off the ornaments and redecorating the tree :)  Yay!...


 And the whole thing probably cost about 6 bucks!  So happy I actually made something I've pinterested!  Hopefully this will serve as motivation to do less oohing and awwing, and more DOing!